Monday 15 July 2013

Green Man Mask continued

I've taken the annealed mask out of the kiln and started work on adding more leaves and details. So far I've learnt;

Getting quite far along, still needs a few more hours yet
1) I need to think more about my work flow.
     I didn't really expect this first attempt to go so well, and jumped around the sculpture a little too much. This has left some areas under more stress as some leaves pull on others, and when I start heating sometimes this stress has caused parts further away to snap. There was quite a lot of re-joining and tweaking as I went back over areas, even just as I finished one of the first leaves came away that'll need re attaching.
    This time I went a little slower, as I added each new leaf I took time to make sure it was well joined, then while it was still hot (and the new join a little flexible still) joined it anywhere else it was touching the main structure to ensure it has at least two firm hold points, then re-heated the first joins just to make sure. I think 'just to make sure' should be the motto for doing this sort of work!

2) Nice work for hot weather.
      I do really need to get more pendants and big marbles made for the next Expo (yes I know it's months away, but foolishly I did book both London and Birmingham which are only separated by a few weeks). It's not too bad until the afternoon when the sun swings around, and the kiln starts getting hotter. This makes a nice change, and as I only need one wheezy old oxycon and the extractor hood on it makes for quite a quite and chilled out working.

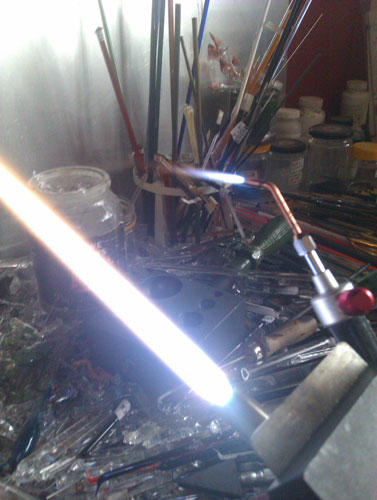
3) Tricky to light, ok once lit
      Talking of old oxycons, it can be a bit tricky to get the mini torch to light and stay lit to start with. It might be because it takes quite a while to get all the air out of the oxygen and propane lines, once it has though it seems (mostly) ok so long as I don't have to turn it back off and on again! This is where a stand would be really helpful, if it allowed it to stay lit when needing both hands free.

4) Tidy that workbench
      Actually, I can't really see that happening, I even get around not needing to tidy it when working 104 glass by putting a board over the top of the debris! A separate little work area, with really, really good light would be ideal though, maybe that's a little higher too.

5) More plaster, less filler
      This poor face cast is starting to look like a bit of a burns victim, or something sort of Evil living-dead-doll from an Asian Horror film! The modroc is charring when the surface gets knocked or flakes off, so a thicker plaster/quartz layer might be better. Maybe also use chicken wire for strengthening instead. I mostly used modroc originally because I happened to have a big unused bag, and it makes quite light casts.
Charred and battered cast

6) Stay calm! Make good support underwear and it can be fixed!
      Hard to do when you heat up one area and another goes 'crack,' but that really probably comes down to the initial problems with not making some of the first joins as well as I should have or putting others under too much stress. Having to go back and re attach them has probably made the whole sculpture stronger and better made though. Next time I'll have to think more carefully about the best way of putting down those first leaves that become the scaffold for the rest of the sculpture.

7) Make more leaves
     This uses a huge amount of leaves, which is ok as I wanted to define the shape just in leaves anyway, but I never seem to make enough. When I've looked at Green Man pictures and original church stone sculptures they make most of the face with very few leaves. Sometimes it's one per face area (i.e. one of each cheek, one for the nose) and then stretch them out to make the shape. I wanted these green faces to be more like you might see them, when in a glimpse out of the corner of your eye the overall shape of the branches and leaves in the trees suggest a face, but then when you look it's gone. Or is that just me?

All in all this has been an interesting project, although it's not finished the next questions are 'do I make another in coloured glass,' and 'do I leave clear or sandblast it to a frosted finish?' And if I did frost it, it then leaves another decision, to then leave it as it is or paint it which leaves a nice matt finish? Mind you, as I don't have an airbrush/sandblaster yet it's probably not really a relevant set of questions!

In other news I might only be at Greenwich this Sunday (or not at all, I'm not sure if I can make it yet) so I am hoping to get some more marbles listed into my Etsy shop this week. As usual I'll give a heads up on Facebook to let you know when I start getting them listed.

Thursday 11 July 2013

New Toy & Green Man/Woman Sculpture

It's been a bit of catch up since the last Expo and class, mostly I've been getting my head down and making new pendants and marbles for the stall. Hopefully they'll be some new marbles trickling through into my Etsy shop again in the next few weeks as well.

However I still want to try and make time to keep practising and improving my sculptural techniques. For a while I've quite fancied a hand torch, something that can go to really fine pin-point flame to tweak and work on details. Of course I couldn't quite justify the expense, it's not just the torch but all the new pipes and connectors too, plus I couldn't decide which one would be best for me. After chatting about hand torches during the course, and then seeing a cool photo of an American artist standing before a three foot sculpture he was assembling with a hand torch, I looked a little harder and came up with a Smiths Mini Torch at a bargain price.

New Little Torch
Although really made for metal work, it's quite popular with some glass artists. Although the flame really is tiny, it's nice and compact, has a tight hot flame, and best of all comes with it's own light and small hoses already attached. The hoses were the clincher, not only did it save an extra expense of new hoses, I didn't fancy having to hold a torch being dragged down by the normal heavy propane hoses.

Work in Progress, glass leaves being added using a plaster former
It's taken a few weeks now before I've had time to play with it though, apart from playing catch up I'm just confirming a very large commission which will keep me busy for weeks (holding breath and touching wood that it comes off, more on that when it's all confirmed!) However there has been an idea that's been kicking around in my head for a while, and this seemed the ideal tool for the job!

These are some 'work in progress' pictures, of a Green Woman mask that I've been making using the little torch to assemble the leaves which I made using my Lynx torch.
Top view of the mask removed from the former, with a leaf beside it

Off the former, this needs to be annealed before I carry on. One of the 'blank' leaves loose beside it
Little torch with it's tiny flame next to my Lynx running a fairy small flame

Before starting on this I've been wondering how to put the leaves together to make a good 3D shape. I figured a former would be the way to go, but I certainly couldn't afford a custom graphite shape in this size. Bellow is a quick run down on how I put this together, using plaster and mod-roc (basically bandages impregnated with plaster-of-paris, which many model shops stock for making hills and mountains on train sets etc.) For the mould I used the packaging from a paint your own mask kit from my local 99p shop! I was going to use the mask, but the plastic blister pack it came in was ideal as I didn't have to plug up the eyes and mouth cut outs, and it was waterproof!

Mask mould, I left the mask underneath to add some support and strength to the mould
This is my first real go with the torch, and it's quite a liberating way of working, although I could really do with a safe stand where I can leave it when lit if I need both hands free. It's a bit temperamental to light and keep lit until the gases have settled down. I found that I can even use a thin stringer to help 'weld' or 'solder' two parts together, and that if I get really close it's fierce enough to even 'push' the glass. I certainly need a bit more practise with it, maybe once I get time to finish this mask off I'll have a go at another once, with coloured leaves this time. It certainly opens up some interesting ideas and new ways of working.


Bellow is a quick run down of how I made the plaster blank, for anyone who wants to try something similar. Do use the torch on this at your own risk though, this is an experimental technique, and the plaster and modroc WILL get burnt as you work!
 
First layer, I used plaster and quartz (equal parts) which is a formula usually used for making kiln casting moulds. I hoped it would provide better heat tolerance for the 'working area' of the cast

Mod-roc, cut into strips and rough squares. Just pass this through a tray of water to moisten and then slap it on!
After adding some more plaster I started building up the sides with modroc and re-enforcing the main part of the cast with the modroc


Add more plaster before the last has set in the hope it all sticks together well!


Alternating now with layers of plaster and modroc, this adds both lightness and some structural strength


It's really easy to smooth out the modroc with a fingertip, be careful not to get it too damp though

Top up to the top, and smooth over so it will lie flat when de-moulded. It's a working cast and this bit isn't going to be seen so no need to make too much of a fuss of neatness.


Broken chin! I made the quartz/plaster layer a bit too thin, and then didn't push the modroc down enough so had a void under the chin which then flaked off. You learn by mistakes!
The finished cast. Now leave to dry, I left this near (but not on) my kiln for about two weeks to make sure it was fully dried.